Popular Blogs


All Blogs
Creating an Azure Maps AutoSuggest for Routing
In this article, I will show you how to implement an autocomplete UI widget with Kendo Core UI that lets users easily create an Azure Maps route between two or more locations.

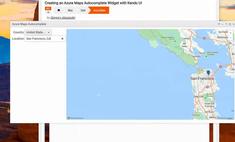
Creating an Azure Maps Autocomplete Widget with Kendo UI
In this article, we will create a simple Azure Maps autocomplete widget that you can use to visually generate Azure Maps in your own web application using jQuery and Kendo Core, both of which are free and open-source.
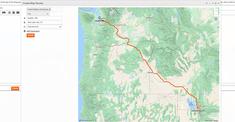
Creating Map Routes with Azure Maps
In this article, I will demonstrate how to create a sophisticated map with routing between multiple points. I will also show you how to create map controls and walk you through the complete code.
Creating Static Maps with Azure Maps
In this article, I will show you how to create a static map using Azure Maps. Unlike many of the partial examples on the Azure Maps sites, this is a fully functional map featuring custom icons, labels, zoom, and map type controls that you can embed into a web page.
Reviewing Azure Maps for Developers - Is Azure Maps the Right Choice?
Over the past few months, I have been developing Azure Maps to migrate away from Bing Maps, and I would like to share my impressions and experiences.
Extending ColdFusion and Lucee Application CFCs in the Root Directory
The application framework in Adobe ColdFusion and Lucee is quite powerful; however, there are some complications when trying to extend functionality to application components that reside in the web root directory.

A Modern Way to Get the Page URL With ColdFusion and Lucee Using the PageContext Java Object
In this article, I will demonstrate how to retrieve page properties using the PageContext object, which is available in ColdFusion and Lucee. This is a much more modern and efficient method than using CGI variables, which are often unreliable.

Introducing GalaxieCache -- A Wickedly Fast Caching Engine for ColdFusion and Lucee
GalaxieCache is a wickedly fast custom tag that saves generated partial page content as a static page to the file system or RAM. Depending on your usage, GalaxieCache is one of the fastest caching solutions and uses native ColdFusion and Lucee cfinclude's to render the content.