Gregory's Blog

How to make the perfect social media sharing image - part 2 Getting the Size Right


There is a lot of information about this on the web- but unfortunately, most of it is wrong or outdated. And this is not necessarily due to the author's mistake. The social media platforms are always fine tuning their image formats and the information changes. To make matters worse, there is conflicting information even when going straight to the source, ie Facebook or Twitter.

For example, here twitter recommends using a 2x1 image ratio1 for their large summary cards, however, twitter has new documentation on its business page mentioning the new 1.91:1 aspect ratio that was updated this August 2. Faceook is a bit better, but there is an overwhelming amount of information out there, and much of it is confusing. I had to learn the proper aspect ratios by digging into a lot of posts, and through trial and error. I have dug into at least a dozen posts for each image type and this is what I came up with and what proved to work for me best.

The following information should be correct as of October 28 2019. I will periodically try to update this list.

  • Twitter

    • Twitter Summary Card with a large image (1.91:1 aspect ratio):

      • Recommended width: 1200 pixels
      • Recommended height: 628

      • Minimum width: 518
      • Minimum height: 226
  • Facebook
    Facebook has a few more options. There is a large image type, but you can also choose from two different smaller image types. The smaller types allow the text to be floated to the right of the image whereas the larger type puts the text at the bottom underneath a larger image. The aspect ratio for the large image size is just a hair bigger than Twitter's Summary Card.

    • Facebook Shared Image (extremely close to the 1.91:1 twitter format, Facebook has a 1.91 aspect ratio):
      • Recommended width: 1200
      • Recommended height: 630

    • Facebook Link Image - Rectangular
      • Minimum width: 484
      • Minimum height: 252

    • Facebook Link Image - Square
      • Minimum width: 116
      • Minimum height: 116
  • Instagram

    • Recommended width: 1080 (1x1 aspect ratio)
    • Recommended height: 1080

    • Minimum width: 600
    • Minimum height: 315
  • Linked In
    LinkedIn images are very narrow and wide.

    • Recommended width: 1128
    • Recommended height: 376

    • Minimum width: 502
    • Minimum height: 282

If this sounds a little confusing, read on to the next post. In the next post, I will show the actual dimensions of each image type, and provide information how to use ColdFusion to manipulate images to obtain the desired size while keeping the proper aspect ratio.


1A 2x1 aspect ratio is recommended on this particular twitter page "Images for this Card support an aspect ratio of 2:1 with minimum dimensions of 300x157 or maximum of 4096x4096 pixels"
2
Yet, this twitter page suggests the new 1.91:1 aspect ratio: "Image size: 800 x 418 pixels for 1.91:1 aspect ratio, 800 x 800 pixels for 1:1 aspect ratio"

This entry was posted on October 29, 2019 at 1:21 AM and has received 1311 views.

How to make the perfect social media sharing image - part 1 Background


Have you wondered how to get a perfect image from your blog when you share your post on social media? I have... and after spending several weeks on this; I think that I have managed to figure it out...

Over the course of the last few months, I have spent quite a bit of time trying to figure out how to effectively share my content on social media sites. I had thought to simply share the image at the top of each post, but I didn't get the size of the image right. The proper image size was different for each social media platform. Finding the proper sizes between the social media platforms was daunting. The information available on the net is often contradictory, and constantly subject to change. Figuring out the proper approach necessitates aiming at a constantly moving target. What worked several months ago might not work the same now. After failing at my initial attempt; I reverted the Galaxie Blog code and used the same default social media image that tended to work for every post. While I was sick of looking at the same mountain logo on every social media post (I assume along with my three regular readers), I had more pressing tasks to deal with. There have been a lot of other features that I wanted to put into this blog first, and wanted to wait until I could take a few weeks to devote to learn by trial and error to get this social media image sharing thing right. There are also other considerations other than just manipulating the image. The social media platforms need to have certain meta tags. After spending the last couple of weeks I found a good approach to solve this. In the next several posts, I will share my journey with you and show you my Galaxie blog implementation. Along the way, I'll provide some ColdFusion scripts for you to resize your own images for social media sharing on your own. Additionally, I hope to provide you some helpful tips.

This entry was posted on October 28, 2019 at 1:29 PM and has received 1265 views.

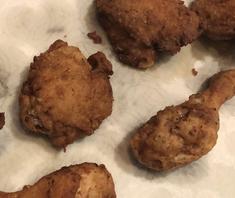
Pressure cooked KFC style chicken with the Magfesa star pressure cookers.


Pressure cooked 'KFC' style chicken with the Magfesa star pressure cookers.

There is absolutely nothing better than 'KFC' style pressure cooked chicken made at home. However, you can only do this with a very limited number of pressure cookers, namely a Magfesa star pressure cooker1, with an extra metal arm that is wrapped around the lid. You can also do this at home using older chicken bucket cookers, but the safety features on the older style pressure cookers aren't as good. You can't do this with any other pressure cooker- certainly not your insta-pot! It will blow up or just melt. Magfesa does not advertise that you can pressure cook using oil due to legal liability- but it is made like the old chicken buckets, and folks use these specific pressure cookers when they use oil. I have cooked this recipe many times at home using a 16 quart Magfesa cooker, but I am super diligent and carefully follow this method.

Add the following in a glass bowl:

  • ½ teaspoon Cayenne pepper. Black pepper, salt.
  • Fill up to the top with buttermilk.
  • Optional: 1 beaten egg.
  • Let chicken sit in buttermilk in the refrigerator for at least 30 minutes. I try to leave in in the fridge for at least two hours. You can also leave it overnight.
  • Take chicken out of fridge for 30 minutes.
  • Create the breading. My typical ingredients include:

    • 2 Cups of flour.
    • 1/3 cup of parmesan cheese.
    • 1 teaspoon Cajun spice mix.
    • 1 teaspoon basil.
    • 1 teaspoon rosemary.
    • 1 teaspoon thyme.
    • ½ teaspoon Cayenne pepper.
    • ½ teaspoon Greek seasoning.
    • ½ teaspoon paprika.
    • ½ teaspoon celery salt.
    • ½ teaspoon ground ginger.
    • ½ teaspoon black pepper.
    • ½ teaspoon salt.

  • Mix thoroughly.
  • Take the chicken out of the buttermilk mixture. Shake the chicken gently in order to drain off the buttermilk for 30 seconds or so. Once drained off, dredge the chicken through the flour spice mix. Use tongs while dipping chicken into mixture.
  • Put aside on lined baking sheet.
  • Wait 30 minutes, dredge again. This time it does not use as much flour. You're only trying to cover portions that were not covered in the first dredge.
  • Wait for 30 minutes to allow chicken to warm up to room temperature. This also allows the flour mixture to bond with the chicken.
  • Dredge again and lightly season the chicken with any extra herbs that you want to put in. Don't over-season.
  • Inspect the main seal and the spinning pressure release by blowing into it and seeing if air comes out. Do not continue if the seal or release valve is not working.
  • In pressure cooker, heat peanut oil up to 350 degrees with the top off. Use a long thermometer to gage temperature. You must use peanut oil, or a specialty oil mixes that are sold to deep fry turkeys with.
  • Other oils won't hold up with the high temperatures, and they may catch fire as the smoke point is too low.
  • Once the peanut oil reaches 350 degrees, use long tongs and carefully drop chicken into the oil. Work in batches, even with a large pressure cooker, I only put in 4-6 pieces of chicken at a time. It is also advisable to wear thick insulated gloves that you would wear when using a BBQ. Be careful of splattering.
  • Cover the pressure cooker and tighten. Wait a minute or two to allow the pressure to build. Do not leave the area once you have applied heat to the pressure cooker.
  • Once pressure builds up and the pressure release top starts spinning, immediately turn down the heat on the burner down a little more than 2/3rds without actually turning the stove off. I turn my electric stove down to 4 (high is set at 15), and set the timer.

  • Set timer for:
    • Legs: 10 minutes.
    • Thighs: 12 minutes.
    • Breast: 15 minutes.

  • Watch the pressure cooker carefully- if the release top starts spinning like crazy, turn the burner down further. If the emergency pressure release is popped (the 2nd safety feature, turn the stove off and move the pot off of the burner.
  • After the timer goes off, release the pressure manually and carefully use tongs to pull the chicken out. I do not put the pressure cooker under water to quick release the pressure. Play it safe- water and oil do not mix.
  • Make sure that the pressure is released before opening the lid, otherwise, you may have oil come up the pot, make a mess, and perhaps get burned.

Helpful tips: for chicken breasts and thighs, you can also gently precook or smoke the meat halfway done prior to soaking the chicken in the butter milk. This allows you to shorten the time by a few minutes and not over-burn the skin.

Happy (and safe) eating!

Further reading:
Cookistry: Pressure fried chicken
Serious Eats: Gadgets: Magefesa Star Pressure Cooker

1Note: I am in no way affiliated with Magfesa, and don't derive any income from this post. I just like deep fried chicken and this is the most economical way to make this at home!

This entry was posted on October 14, 2019 at 10:15 PM and has received 1351 views.

Building your own Disqus Recent Comments Widget


This article will show you a way to use the Disqus API key to build your own custom recent comments Disqus widget. Do you really need your own custom Disqus Recent Comments Widget?A recent comments widget is a tool that allows blog owners to show the most recent comments on a page. If you're just using Disqus on a static site that does not contain all of the blog entries, you might not need to roll your own custom recent comment widget. And, even if you do have a page that contains all of the blog entries, you may not need a custom widget- Disqus already provides one. To incorporate it, all that you need to do is replace the 'gregorys-blog' string with your own Disqus Blog Identifier (also known as the blog short name) like so:

<script type="text/javascript" src="https://gregorys-blog.disqus.com/recent_comments_widget.js?num_items=10&hide_avatars=0&avatar_size=40&excerpt_length=100"></script >

This is a basic widget, and it contains nearly everything that you may need. My code falls back to this approach in Galaxie Blog when the blog owner does not paste in his own API Key. However, it is not flexible. It is what you see is what you get, and I wanted to blend the recent comment widget with Galaxie Blogs themes, and needed other things, such as having to use the Disqus API to have my own statistical reporting. I'm a stickler for design- I personally determined from the outset that I need roll my own Disqus recent comments widget, and I'll share my approach... Building your own Disqus Recent Comments Widget

  1. First, you will need to obtain a Disqus Blog Identifier (aka Blog Short Name) and a Disqus API Key. If you don't already have these keys, the following articles should help you in getting these:
  2. The code below is the style sheets that I developed for Galaxie Blogs recent comments. There is nothing interesting to note here but I am sharing to give you a starting point:
<!-- Styles for disqus -->
<style>
	.userProfile {
		margin: 15px 0;	 
		list-style-type: none;	 
		clear: both;
	}

	img.disqusAvatar {
		width: 64px;
		height: 64px;
		float: left;
		position: relative;
		z-index: 99;
		border: 0px;
		margin: 0px;
		/* The padding needs to be uniform, otherwise the avatar circle will be elongated */
		padding: <cfoutput>#avatarPadding#</cfoutput>;
		-moz-border-radius: 50%;
		-webkit-border-radius: 50%;
		-webkit-box-shadow: 0 1px 2px rgba(0,0,0,0.2);
		-moz-box-shadow: 0 1px 2px rgba(0,0,0,0.2);
		box-shadow: 0 1px 2px rgba(0,0,0,0.2);
		overflow: hidden;
	}

	#disqusCommentDiv a {
		overflow: hidden; /* Prevent wrapping */
	}

	#disqusCommentDiv p {
		display: inline; /* Prevent wrapping */
	}

	#disqusCommentPanel a {
		overflow: hidden; /* Prevent wrapping */
	}

	#disqusCommentPanel p {
		display: inline; /* Prevent wrapping */
	}

	.comment-avatar img {
		width: 100%;
		height: 100%;
	}
</style>
  1. The real magic happens in the javascript below. I'll try to walk you through some of the more interesting tidbits
    1. The getRecentDisqusComments function makes a call to the Disqus API invoking the listsPosts method
    2. Additionally, the related=thread argument is appended to the URL string. This argument allows us to get the URL and Title of the post. Without this argument, we would need to make another call the threads list method, which is frankly a nightmare1.
    3. We are passing our Disqus keys in the Ajax post
    4. The getDisqusCommentsResponse callback method retrieves the data and writes out our custom HTML. Here, I am using my own custom class definitions to make the widget blend in with my own themes.
    5. The isOdd method assists in creating alternate colors of each row.
    6. The timeSince method is used to append a string to tell the viewer when the comment was made (ie '20 seconds ago').
    7. Finally, the truncateString method is used to truncate the comment string.
function getRecentDisqusComments(){

	// Submit form via AJAX.
	$.ajax(
		{
			type: "get",
			url: "https://disqus.com/api/3.0/forums/listPosts.json?related=thread",
			data: {
				// Passing my own keys.
				api_key: "<cfoutput>#application.disqusApiKey#</cfoutput>",
				forum:  "<cfoutput>#application.disqusBlogIdentifier#</cfoutput>",

				limit: "<cfoutput>#numComments#</cfoutput>"
			},
			// jsponp is supported as well. 
			dataType: "json",
			cache: false,
			success: function(data) {
				setTimeout(function () {
					// Callback function
					getDisqusCommentsResponse(data);
				// The timeout ensures that the data will be available to the callback function.
				}, 250);
			}
		}
	);
}//..function getRecentDisqusComments(){

function getDisqusCommentsResponse(data){
	var html = "";
	// Loop through the json structure.
	for (var i = 0, len = data.response.length; i < len; i++) {
		// Isolate our post (or entry).
		var post = data.response[i];
		// Set a current row value from our index. I need a whole number to determine the alternating row color. I could just use [i]+1, but I am setting this for readability.
		var row = parseInt([i]);
		// Get the data for the post.
		var authorName = post.author.name;
		var authorProfileUrl = post.author.profileUrl;
		var authorAvatarUrl = post.author.avatar.cache;
		// We need to strip the HTML out of the comment. It has links that are not useful and will take up our space.
		var comment = stripHtml(post.message);
		var commentPromoted = post.isHighlighted;
		var approved = post.isApproved;
		// Get the timestamp and convert it into a proper js date object.
		var created = new Date(post.createdAt);
		// Find the link to the actual article. Note: for this to work, you must have related=thread appended to the ajax link (ie https://disqus.com/api/3.0/forums/listPosts.json?related=thread).
		var pageLink = post.thread.link;
		var pageTitle = post.thread.title;

		// Create the HTML. We will try to keep this nearly identical to the recent comment widget, but put in our own kendo classes here.
		// Crete the table on the first row.
		if (row == 0){
			html += '<table id="disqusComment" align="center" class="k-content fixedPodTableWithWrap" width="100%" cellpadding="0" cellspacing="0">';
		}
		// Create the row and alternate the k-content and k-alt class.
		if (isOdd(row)){
			html += '<tr class="k-alt" height="50px;">';
		} else {
			html += '<tr class="k-content" height="50px;">';
		}
		// After the first iteration, create a row with a border. Javascript arrays (which is our 'row') start at 0.
		if (row == 0){
			html += '<td align="left" valign="top" class="userProfile">';
		} else {
			html += '<td align="left" valign="top" class="border userProfile">';
		}
		// Wrap the avatar with the authors profile link
		html += '<br/><a href="' + authorProfileUrl + '" aria-label="Profile for ' + authorName + '" rel="nofollow noopener">' + authorName;
		// Place the avatar into the cell and close the anchor link.
		html += '<img class="disqusAvatar" src="' + authorAvatarUrl + '" aria-label="Profile for ' + authorName + '"></a><br/>';
		// Add the comment. The comment is already wrapped with a paragraph tag.
		html += truncateString(comment, <cfoutput>#lenComment#</cfoutput>) + '<br/>';
		// Create the HTML to insert into the page title.
		html += '<a href="' + pageLink + '" aria-label="' + pageLink + '">' + pageTitle + '</a> - ';
		// Add the timestamp to quickly identify how recent the post is.
		html += timeSince(new Date(created)) + ' ago<br/>';
		// Close the cell and the row.
		html += '</td></tr>';
		// Close the table on the last row
		if (row == <cfoutput>#round(numComments-1)#</cfoutput>){
			html += '</table>'
		}
		// Append the html to the page.
		$(document).ready(function() {
			$("#recentCommentsDiv").html(html);
			$("#recentCommentsPanel").html(html);
		});

	}//..for (var i = 0, len = data.response.length; i < len; i++) {

}

// Helper function to determine if the number is even or odd. This is used to create alternating row colors.
function isOdd(num) {
	return num % 2;
}

function stripHtml(html){
	html.replace(/<[^>]*>?/gm, '');
	return html;
}

// Function to write out the time since the post.
// Source: https://stackoverflow.com/questions/3177836/how-to-format-time-since-xxx-e-g-4-minutes-ago-similar-to-stack-exchange-site	
function timeSince(date) {
  var seconds = Math.floor((new Date() - date) / 1000);
  var interval = Math.floor(seconds / 31536000);

  if (interval > 1) {
	return interval + " years";
  }
  interval = Math.floor(seconds / 2592000);
  if (interval > 1) {
	return interval + " months";
  }
  interval = Math.floor(seconds / 86400);
  if (interval > 1) {
	return interval + " days";
  }
  interval = Math.floor(seconds / 3600);
  if (interval > 1) {
	return interval + " hours";
  }
  interval = Math.floor(seconds / 60);
  //alert(interval + ' minutes date: ' + date);
  if (interval > 1) {
	return interval + " minutes";
  }
  return Math.floor(seconds) + " seconds";
}

truncateString = function(str, length, ending) {
	if (length == null) {
		length = 100;
	}
	if (ending == null) {
		ending = '...';
	}
	if (str.length > length) {
		return str.substring(0, length - ending.length) + ending;
	} else {
		return str;
	}
};

// Call the method to populate the recent comments.
getRecentDisqusComments();

If you have any questions, don't hesitate to ask. Happy commenting! Further Reading: 1Raymond Camden has an excellent article at https://www.raymondcamden.com/2014/03/21/Example-of-a-JavaScript-Disqus-Recent-Comment-Widget. I wished that I had read this earlier before going down my own rabbit hole. To get the related post, I initially tried to call the thread list method (at https://disqus.com/api/3.0/threads/list.json) within a nested ajax post. My initial code was just... ugly. Finally, I stumbled upon this article and found out that I could simply use the related=thread argument to attach the comment to a thread.

This entry was posted on October 7, 2019 at 11:06 PM and has received 1206 views.

Adding multiple Disqus comments on one page


While incorporating comments into my main blog page, I found out that Disqus does not provide a native way to place multiple comments on a single page. The Disqus commenting system includes an embedded javascript at the end of an article. The javascript writes out the commenting interface using global variables and it can't be included twice. This poses a problem as my main blog page contains all of my blog posts, and I wanted the readers to be able to comment without having to go to each individual entry page. After research, I figured out way. I'll share my approach and give the reader other resources so they can do the same.

Background

While researching, I found a promising lead... Most of the folks that have skinned this cat referred to an article written by mystrdat that is now long since dead. I dug it up using the wayback machine at https://web.archive.org/web/20170606070513/http://mystrd.at/articles/multiple-disqus-threads-on-one-page/. It is an excellent article, and if you're trying to do the same thing, it is worth a read. There were other helpful resources that I found. Shawn Zhouprovides a list of articles that solved this issue. Shawn uses iframes to encapsulate the Disqus comments. Tsachi Shlidor shared his approach using inline comments. His demonstration and code is on github at http://tsi.github.io/inlineDisqussions/. Since I already built my own commenting system using the open sourced Kendo Core UIwindow widgets, I chose a different approach. I am encapsulating Disqus logic into various Kendo windows. You can use the same approach that I used with a different windowing library, such as jQuery UI. Using multiple Disqus comments using a Kendo window widget

  1. First, I took the Disqus universal code script and saved it as a new ColdFusion template. Note that the this.page.url and this.page.identifier are dynamic variables. These will be passed to the window via the URL.
<!--- Note: the disqus_shortname, URL and identifier are passed to this page via the URL. --->
<div id="disqus_thread"></div>
<script type="text/javascript">
	/**
	*  RECOMMENDED CONFIGURATION VARIABLES: EDIT AND UNCOMMENT THE SECTION BELOW TO INSERT DYNAMIC VALUES FROM YOUR PLATFORM OR CMS.
	*  LEARN WHY DEFINING THESE VARIABLES IS IMPORTANT: https://disqus.com/admin/universalcode/#chr(35)#configuration-variables*/
	
	var disqus_config = function () {
	var disqus_shortname = '<cfoutput>#URL.alias#</cfoutput>';
	this.page.url = '<cfoutput>#URL.url#</cfoutput>';  // Replace PAGE_URL with your page's canonical URL variable
	this.page.identifier = '<cfoutput>#URL.Id#</cfoutput>'; // Replace PAGE_IDENTIFIER with your page's unique identifier variable
	};
	
	(function() { // DON'T EDIT BELOW THIS LINE */
		var d = document, s = d.createElement('script');
		s.src = 'https://gregorys-blog.disqus.com/embed.js';
		s.setAttribute('data-timestamp', +new Date());
		(d.head || d.body).appendChild(s);
	})();
</script>
  1. Second, I created the scripts to create a new Kendo window. The only thing of interest in the code below is that I am passing the URL and Identifier variables that the universal code script needs (this.page.url and this.page.identifier in the code above):
// Disqus comment window ---------------------------------------------------------------------------------------------------------------------------------
function createDisqusWindow(Id, alias, url) {

	// Remove the window if it already exists
	if ($("#disqusWindow").length > 0) {
		$("#disqusWindow").parent().remove();
	}

	// Typically we would use a div outside of the script to attach the window to, however, since this is inside of a function call, we are going to dynamically create a div via the append js method. If we were to use a div outside of this script, lets say underneath the 'mainBlog' container, it would cause weird problems, such as the page disappearing behind the window.
	$(document.body).append('<div id="disqusWindow"></div>');
	$('#disqusWindow').kendoWindow({
		title: "Comments",
		actions: ["Minimize", "Refresh", "Close"],
		modal: false,
		resizable: true,
		draggable: true,
		// For desktop, we are subtracting 5% off of the content width setting found near the top of this template.
		width: (getContentWidthPercentAsInt()-5 + '%'),
		height: "60%",
		iframe: false, // Don't use iframes unless it is content derived outside of your own site. 
		content: "/blog/disqus.cfm?id=" + Id + '&alias=' + alias + '&url=' + url,// Make sure to create an absolute path here. I had problems with a cached index.cfm page being inserted into the Kendo window probably due to the blogCfc caching logic. 

		close: function() {
			$('#disqusWindow').kendoWindow('destroy');
		}

	}).data('kendoWindow').center();
}//..function createDisqusWindow(Id, alias, url) {

// The mobile app has a dedicated button to close the window as the x at the top of the window is small and hard to see 
function closeDisqusWindow(){
	$("#disqusWindow").kendoWindow();
	var disqusWindow = $("#disqusWindow").data("kendoWindow");
	setTimeout(function() {
	  disqusWindow.destroy();
	}, 500);
}
  1. Then, on the web page itself, I am showing the following button that calls the createDisqusWindow function above. I am adding this button for every single blog entry on the page. In the button, I am adding the entry ID as the first argument (the this.page.identifier), the 2nd argument, the entries 'alias' (disqus_shortname), and the entry URL is passed to the this.page.url.
<button id="disqusCommentButton" class="k-button" style="width:125px; font-size:0.70em;" onClick="createDisqusWindow('6C04DC8C-FF58-C02F-8C38E2BEEBCA282B', 'Incorporate-Disqus-into-Galaxy-Blog--Part-3', 'https://gregoryalexander.com/blog/index.cfm/2019/10/6/Incorporate-Disqus-into-Galaxy-Blog--Part-3')">
	<i class="fas fa-comments" style="alignment-baseline:middle;"></i>  Comment
</button>
  1. To display the comment count, I am placing the disqus-comment-count with the URL of the entry. Note: if you want, you can replace the span tags with an anchor tag ('a href') and include an onClick event to open up the comments window.
<span class="disqus-comment-count" data-disqus-url="https://gregoryalexander.com/blog/index.cfm/2019/10/6/Incorporate-Disqus-into-Galaxy-Blog--Part-3"></span>
  1. Finally, at the very bottom of the index.cfm page, I am adding the disqus comment count script:
<script id="dsq-count-scr" type="deferjs" src="//gregorys-blog.disqus.com/count.js" async=""></script >

For a demonstration, go to https://gregoryalexander.com/blog/index.cfm, click on a comment link, and make a comment or at least say hi! Happy coding! Gregory

This entry was posted on October 7, 2019 at 4:10 PM and has received 2013 views.


Footer Logo

Your input and contributions are welcomed!

If you have an idea, BlogCfc based code, or a theme that you have built using this site that you want to share, please contribute by making a post here or share it by contacting us! This community can only thrive if we continue to work together.

Images and Photography:

Gregory Alexander either owns the copyright, or has the rights to use, all images and photographs on the site. If an image is not part of the "Galaxie Blog" open sourced distribution package, and instead is part of a personal blog post or a comment, please contact us and the author of the post or comment to obtain permission if you would like to use a personal image or photograph found on this site.

Credits:

Portions of Galaxie Blog are powered on the server side by BlogCfc, an open source blog developed by Raymond Camden. Revitalizing BlogCfc was a part of my orginal inspiration that prompted me to design this site.

Version:

Galaxie Blog Version 3.12 (Toby's Edition) December 10th 2022 Blue Wave Dark theme